Optimize your Image File Sizes on Squarespace for Faster Loading
Building a beautiful Squarespace website is just the beginning. Once your work as a creative is complete, it’s time to hone in on your brass tacks to ensure the hard work you’ve put in pays off. This requires optimizing your website for search. One of the low hanging fruit methods for doing this involves optimizing Squarespace image sizes.
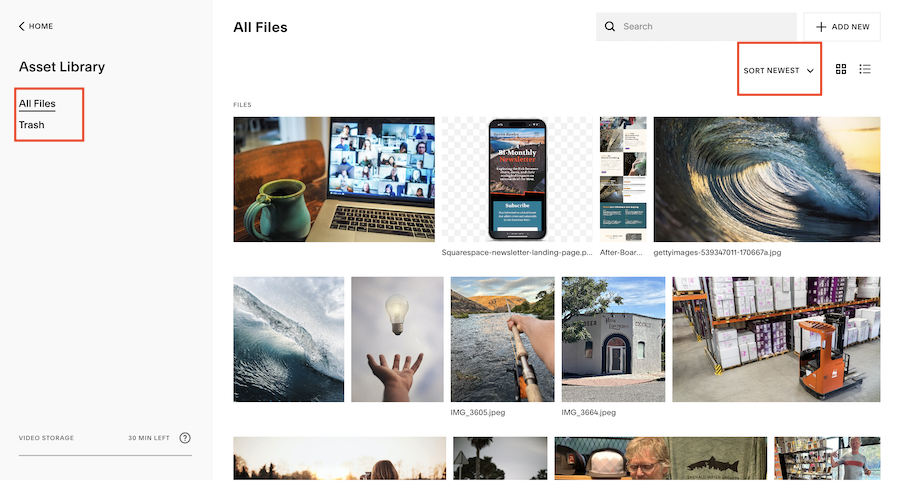
If you’re in the market for building a new website on your own or thinking about migrating from one website hosting platform to another, Squarespace is a great option for managing your images. They have a built-in Asset Library that allows you to upload images in mass. What this means is that you can optimize all of your image files before adding an image folder to your Squarespace asset library.
Oftentimes, as a designer, clients will share images that are way too big to display on a Squarespace website. I recently received a folder of images with an average file size of 8 megabytes. This is roughly 1000% times bigger than what’s recommended. There are differing opinions on this, but as a general rule of thumb your Squarespace image size shouldn’t exceed 500 kilobytes. I don’t understand the math but 500 kb can be achieved through multiple different methods:
Image Compression Tools
Mac Preview Tool
Upload all of your images at once and control the total MB output using the built-in tool on Preview.

Aren’t Larger Image Sizes Typically Better Quality?
The short answer is yes. However, you’d be impressed with how much quality is retained after compressing your Squarespace images. For example, an image that is 2MB and compressed to less than 500KB will oftentimes look just as good! Compressing Squarespace images can be done using any of the aforementioned tools by uploading single image files, or multiple images files/folders at once. This makes it easy to batch compress your images to fit within the recommended image file size for optimal page speed and SEO.
For banner images, or images that display the full width of the page in the header section of your website, I recommend an image file size of 2000px wide and shot in landscape orientation. Landscape orientation allows the image to display properly on all devices, and not get cut off on mobile. When displaying full-bleed images (images that span the entire width of the web page) it’s important to have a bit larger image file size to ensure your images display crisp for your site visitors.

Landscape image orientation for larger images that span the width of the page are best!
Why Does Image File Size Matter?
When you upload your image to Squarespace, the editor creates multiple versions of your image so that it looks great across multiple devices (large desktop, tablet, and phone). Rest assured that the image you uploaded for your homepage is going to look great on any device. There are 7 image file sizes Squarespace creates for each image uploaded to your site:
100 pixels
300 pixels
500 pixels
750 pixels
1000 pixels
1500 pixels
2000 pixels
Here Are Some Best Practices to Keep in Mind When Uploading Images to your Squarespace Site:
Image Orientation and Squarespace
If you plan on showcasing an image on one of your pages that is more of a portrait orientation that takes up half of the page, you will want to compensate for this by selecting the proper image orientation (landscape or portrait). This basically just means…is the image wide or narrow?
.JPG or .PNG Image Files Only
Squarespace only supports these two image file types. In certain instances, you can also upload a .GIF file. Why does this matter? Because .PNG files typically are much larger in size, it’s important to decide whether these should be used throughout the site, or sparingly. .PNG images are typically reserved for images that have a transparent background. Think of a logo image that needs to be uploaded to your website so that it displays properly on all pages on your site, regardless of the background image color.
Aspect Ratio
In layman’s terms, this is the size of your image in height relative to width. Again, you need to apply images to specific scenarios here. If you only have a very narrow and tall space to add an Image Block on your Squarespace website, you will need to choose an image that’s more of a 2:3 aspect ratio to account for the space it will encompass within the Image Block container.
Squarespace Image File Size Best Practices
There are a hell of a lot of different ways to upload an image to your Squarespace website. From logos, to browser icons and social sharing images, each upload requires a different set of best practices. As long as you stick to the basics of what I’m going to share below, you’ll set yourself, and your website, up for success!
Optimal Image File Size for Squarespace Websites
As a rule of thumb, keep all images under 500KB. This will allow your website to load faster, and provide a better user experience for your site visitors. Because nobody wants to wait for a website to load! Here’s a list of best practices to follow when uploading your images to your Squarespace website or using Squarespace’s integration with Unsplash and Getty:
Banner Images
For banner images, upload image files at 2000px wide. Squarespace automatically creates several versions of your image (more on this above). Ensure the aspect ratio is as close to 3:2 as possible to ensure your image displays properly across multiple devices, without getting cropped.
Inline Images
For inline images, or images that display next to accompanying text or other media throughout the internal pages on your website, make sure that the image fits the container space. What this means is that I wouldn’t upload a 2:3 vertical image to take up the image container space on a page where there’s a short and wide container.
Inline images should be uploaded as close to 1500px wide as possible to ensure they display clear and crisp across multiple devices when site visitors are browsing. Ensure each image uploaded is less than 500KB.
Favicon Images
Favicon images are the image that displays in your browser when you land on a website. By default, Squarespace displays a black square (which you’ll definitely want to remove and replace). They are important because they showcase a level of professionalism for your website and aid your site visitors in knowing they’re in the right place.
Favicon images can display at 100px x 100px and 300px x 300px. However, this exact image file size will be dependent on what the aspect ratio of your logo image is. For example, if your logo image is set at a 3:2 aspect ratio, it’s safe to upload your favicon image at or near 300px and 300px wide.
Squarespace Images can Make or Break your Website
By following these best practices, you’ll show your site visitor, and Google, that you care about the user-experience. By uploading Squarespace image’s that are properly compressed, shot with good lighting without pixelation, you are giving your website a front row seat to rank higher on search engines. Image files that have been properly uploaded, compressed, and that contain alt text and image file names that match the content of the image, will also give you a much needed boost in the eyes of the major search engines.
Your Squarespace Designer
I'm Travis, an expert Squarespace web designer and 7+ year former Squarespace employee. I have worked with every type of business, building platforms for solo entrepreneurs through to multi-million dollar corporations. If you want to discuss a potential project, you can email me at travis@coyotemooncreative.com or get in touch with me here. Alternatively, you can book a 30-minute consultation call here.